Friday, 25 September 2015

Pizza Cake!


This is a bit like a lasagna... but with pizza layers instead of pasta sheets and pizza topping instead of meat/vegetables and white sauce.


I'm not advocating this as a regular meal, but it is delicious.

Serves: 6, with a salad.
Time to make: 2 hours

For the dough:
- 600g white bread flour
- 2 tsp yeast
- 2 tsp salt
- 2 tbsp oil
- 400ml water

^ These quantities actually depend on the size of your cake tin. Mine was 23 cm in diameter and the pizza cake filled it to the top.

For the sauce:
- 1 medium onion
- 3 cloves garlic
- 3 carrots
- 1 tin tomatoes
- some sundried tomatoes (5/6)
- some whole tomatoes (~4 large ones)
- basil

For the filling:
- mozzarella cheese
- salami slices
- anything else you like the sound of, e.g. olives
(nothing too wet or it will make the dough soggy)

Preheat oven to gas mark 6, 200C (I find people know how long their ovens take to warm up so I'm putting this at the beginning so you know in advance)

1. Chop the onions, garlic and carrots into smallish pieces.
2. Make the sauce. Fry the onion, carrots and garlic until soft. Add the tin of tomatoes and some basil and other seasonings. Leave to simmer. (I do this to make sure it is thick and not watery).

The image on the left is before I added the tomatoes, which is why it doesn't look much like tomato sauce...
3. Meanwhile, make the dough. Put the flour in a large bowl and add the yeast and salt. Make a well in the middle and add the water and oil. Mix with a spoon until it starts to come together, then get in with your hands and roll it into a ball. No need to leave to prove, etc. as it's pizza dough


4. Divide the ball into two. Take the first ball and divide into three. Roll each ball into a circle the same diameter as your cake tin. I used the removable base as a guide but you could probably trace round the outside of the cake tin as the dough does shrink inwards a little, I found.


5. Blind bake these three bases for 15 minutes at 200C, gas mark 6.


6. Hopefully your sauce is thickening up by now. Cut up the whole tomatoes and sundried tomatoes and add them. Cook for 5 mins then blend to smooth.

7. Roll out the other half of the dough and use it to fill the sides of the cake tin. My dough came out strangely wet and I ended up smearing it around the sides. So when it came to removing it from the tin it was a bit tricky (it was stuck to the sides), but mine still worked which shows you can go a bit wrong without messing up 100%

8. Place the first base in the bottom. I used the largest so it sealed the gap nicely and no sauce could leak out.

9. Cover the base with the sauce and toppings.

You can see a mistake I made in this photo, by not putting the side-dough up to the top. This is because I thought it wouldn't reach that far. It did. 

Look how beautiful these colours are!!


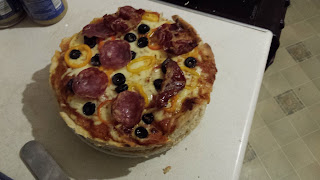
10. Then repeat with the other two bases, leaving some cheese and salami to melt on top. Yuuuum


11. Cook for 25-35 minutes at gas mark 6, 200C, depending on size of final pizza. (With these quantities I'd go for 35 minutes).

I'm really happy with how this came out because I have to admit I had my doubts about whether it would actually work, and it did!



Thursday, 24 September 2015

Apple, toffee pastry things: An Experiment

So I've decided to just make up a recipe and see how it turns out. (I write this before they've been completed)
We had a few things left over from our various cooking escapades recently. These included:
1) toffees from the pear and toffee muffins
2) an extra apple from my two-course pasty
3) pastry from the aforementioned pasty

This more a description of what I did, I can't really give an ingredients list because I made up the quantities (you know, throw it all in a pan and hope for the best?)

1) Firstly I melted the toffees. I added some milk so they wouldn't burn. Then I thought 'this doesn't look like much' and added butter and muscovado sugar too (that's what gives the brown colour, no chocolate)


 2) Chopped up the apple.


3) Lined four ramekins with baking parchment. Then lined them with pastry. My whole 'cut out a circle and lower it in' didn't really work so it ended up being 'smudge the pastry into a layer around the side and bottom'

4) Filled manikin with apple. Poured a tablespoon of toffee mixture on top.


5) Had pastry left over so made some lids.


6) Cooked them on the highest setting on our oven (remember its two settings, hot and cold?) until I could smell them. This was about 35 minutes.


I then took them out of the oven and the bottom wasn't cooked properly so I put them back in for 10 minutes upside down, having taken them out of the ramekins

Results:
- I would make a thicker pastry casing
- Use whole toffees chopped up instead of melted down so it isn't too wet
- But them in a muffin tin maybe instead of ramekins, as the bottom didn't cook properly the first time round

Either way, they still tasted delicious!

Wednesday, 23 September 2015

White Cob

Today I made soup. I won't share the recipe here, but if you want to recreate something similar, the summary is: put all the random bits of vegetables from your fridge into a pan, add 1l of stock, boil then simmer for 20 minutes, whisk up and season with herbs/chilli/pepper etc. It tastes a lot nicer than this makes it sound... :D
To go with the soup I decided to try making some bread. I've done quite a few pizza bases but I've never really made bread myself besides helping Louise with her stunning focaccia.
It was so fun!!


This is the recipe I did:

Makes: 1 loaf of bread
Takes:
4 hours prep (this includes 3 hours proving)
+ 30 mins bake

Ingredients:
500g strong white bread flour
10g salt
10g instant yeast
30g unsalted butter, softened
320ml cool water
olive oil


1. Put the flour in a large bowl. Add the salt and yeast at opposite side of the bowl. Add the butter and 3/4 of the water. With your fingers, stir the mixture in a circular motion. Slowly add the rest of the water to incorporate all of the flour. The dough should be soft but not soggy.


2. Cover the work surface with a little oil. Knead the dough for 5-10 minutes through the wet stage until the dough starts to form a soft, smooth skin and feels silky. Put the dough in a large, greased bowl and cover with a tea towel. Leave for 1-3 hours until it is at least doubled in size and is bouncy and shiny.


 Apologies for pixellated photos


3. Place the dough on a lightly floured surface. Shape into a ball by pushing it inwards to knock out the air. Flatten the dough into a rough rectangle and roll into an oblong. Turn the dough so the longer edge is running away from you and flatten it slightly. Fold the two ends in towards the centre, giving up a chucky squarish shape. Turn the dough over so the join is underneath.

At this point I had a mindblank as to what shape an 'oblong' was. There was a reason for this: it's not really a shape, it's an elongated version of a shape (can be rectangular, oval). I suppose it means 'long rectangle', essentially.

4. Now to create the smooth, domed cob shape:
With your palms turned upwards, position your hands on each side and slightly under the dough. Tuck the dough neatly underneath itself. Continue to force the sides down and underneath to create a smooth, taut top and a rough underside. Try not to add too much extra flour.

5. Line a baking tray with baking parchment. Place the dough on the tray and place this in a clean plastic bag. Leave to prove for about 1 hour, until it has doubled in size (of course) and the dough springs back if you prod it gently. Meanwhile, turn the oven up to 230 degrees C/gas mark 8. Put a roasting tray in the bottom to heat up.


6. Once ready, dust your dough with some flour and then slash deeply with a knife. Add hot water to the hot roasting tray, this will create steam giving the bread a lighter crust. Put the bread in the oven and bake for 30 minutes, or  until the bread is cooked and sounds hollow when tapped on the bottom. Leave to cool on a wire rack.


aaaah :( Our stupid broken tiny oven burnt the top of my bread (hence the craters). Otherwise, it was perfect! 

I then got curious and wanted to know why they're called 'cobs'
Here are some 'facts' I read on the Internet (so... they may or may not be true)

1) a cob is a large bun. A loaf techincally refers to bread that is more than one portion. But I wouldn't advise eating the whole cob on your own
2) they're called cobs because they're the same size as a cobblestone (personally, I think this one is the least likely to be true)

3) the word 'cob' was used as early as 1616 to describe a small, rounded heap or mass, for example; a cob of grain (this is still a valid definition)

The more you know, hey?


As a side note, look how beautiful and colourful this soup is


Two-course pasty

This is a magical idea. The pasty I made was half pork, half apple compote, but other ideas include lamb and rhubarb or chicken and plums.

Serves: 4

Ingredients:
For the pastry:
400g plain flour
200g cold unsalted butter, cut into cubes
About 75ml of milk

(or: like me, be lazy and buy some pastry)

For the filling:
250g pork, or other meat, cut into 3cm cubes
100g peeled vegetables, cut into 3-4mm pieces
(I did 50g potatoes, 50g carrots. The recipe just said potatoes)
1 medium onion, finely chopped
2/3 shakes of Worcester sauce, or any sauce really: I used a nice chilli and ginger one
25g butter, melted
250g apple (or other fruit), peeled, cored and cut into 2-3cm pieces
50g caster sugar

For the topping:
Eggwash (1 egg + 1 tbsp milk)
1 tbsp chopped rosemary
2 tbsp caster sugar

Method:

1. If making the pastry:
Sift flour into a bowl. Combine with butter to form breadcrumb-like mixture. Add milk little by little until pastry just comes together. Knead lightly on floured surface to form a ball. Wrap and chill for 30 mins.
 
2. Preheat oven to gas-mark 4, 180 degrees C. Line a large baking tray with baking parchment.

3. Combine pork, vegetables, onions, sauce, melted butter in a bowl and season. Stir well. As you can see from the image, I actually browned the meat off a little first as I am concerned about the ability of our oven to cook things properly. No need to do this if you have faith in your oven.

4. In another bowl, combine the apple and sugar. I also added some raisins, but that's up to you.

5. Divide the pastry into four (or five, is you had too much. Like me). Roll into circular shapes and then use a plate to cut a circle with a 20cm diameter.

6. Place the meat and fruit on one half of the circle, taking up a quarter each. Leave a 2cm gap for sealing.

7. Brush the 2cm gap with eggwash, fold over the pastry and crimp the edges. Then brush the surface with eggwash and sprinkle the rosemary on the savoury half and the sugar on the sweet half.

Funny story: when I was adding the sugar to the apple, a huge lump came out of the jar so I got abour 3x as much sugar as was required. So instead of adding more sugar on top, I sprinkled the sweet side with cinnamon. It went really well.
8. Bake the pasties for 35-40 minutes until golden and cooked through.
Before cooking


YUM!


Monday, 21 September 2015

Chocolate Orange Fudge Squares

Hi everyone! I've decided to write this blog post for Louise as she's a school and I'm not. (In other words: she's doing important things with her life and I, currently, am not).
This is a recipe for chocolate orange (my favourite chocolate flavour) fudge squares. They're essentially brownies, with the added delight of orange cream cheese icing. Which is beautiful, by the way.

Makes: 16 squares
Time: 40 minutes + cooling


Ingredients:

175g butter, extra for greasing
200g dark chocolate, broken into cubes
200g dark muscovado sugar
3 large eggs, separated
140g plain flour
1 tsp vanilla extract
zest of one orange

ICING:
200g cream cheese
1/2 tsp vanilla extract. We also added some orange extract
50g icing sugar


Method:
1.
Pre-heat oven to 180 degrees C, gas mark 4.
Or turn the temperature up as far as it will go if you have a broken oven like us that only really does two temperatures: cold and hot.
Butter and line a tray-bake tin, around 23x23cm. Ours was slightly smaller so we had thicker fudge squares, which was nice.

2.
Put the chocolate, butter and sugar into a pan and heat gently for around 5 mins until smooth.
Leave to cool for 10 minutes,


3.
Add the eggs, flour, vanilla and half the orange zest to the chocolate mixture, beating the ingredients together as you go.

4.
Put the egg whites into a large bowl and whisk until they form soft peaks, like the beginning of a meringue. Stir a spoonful of the egg whites into the chocolate mix to loosen it (not entirely sure what difference this made when we were doing it, but never mind). Then fold in the rest of the egg whites.
(In our recipe it specifically stated 'with a metal spoon'. I would appreciate it if someone could tell me what the deal is with metal vs. wooden spoons but it made no difference to us so I'm not going to tell you what sort of spoon to use)

5.
Pour the mixture into a tin and bake for 25 minutes until evenly risen and firm to the touch. Cool in the tin, then cut into squares.


6.
Beat together the cheese, vanilla (and orange, if using), sugar and remaining orange zest until smooth. Spread over each chocolate square and serve.


Sunday, 6 September 2015

Pear and Toffee Cupcakes

They're not beautiful but that detracts nothing :) Sorry for the very long break.

Pear and Toffee Cupcakes
Serves: 12
Prep time: 15 minutes
Cooking temp: Gas 6, 200C
Cooking time: 25 mins


Ingredients
 300g self raising flour
1 tsp baking powder
2 tsp cinnamon
85g golden caster sugar
250 ml milk
2 large eggs
100g melted butter
2 large ripe pears
100g toffees
Granola or nuts to top

Method
  1. Preheat the oven and  line a 12 hole muffin tray with cases. Chop up the toffees at a minimum into quarters, or preferably smaller, and slice the pears into small chunks (peeled and cored)
    Louise is well aware that these pears aren't peeled. Shhhhh
  2.  Tip the flour, baking powder, cinnamon and sugar into a large bowl and make a well in the centre.
  3. Combine the milk, eggs and melted butter and whisk, then add to the dry mix with the pear and  a third of the toffee, to make  a lumpy batter
  4. Spoon between the cases, filling them almost to the top. Sprinkle over the remaining toffee and add a little granola/oats/almonds nuts to the top (anything to add crunch)
    I have 3/4 the recipe here to make just 8 so ignore that
  5. Bake for 25 mins until golden, risen and the toffee has melted. Leave to cool slightly but eat whilst warm (or you can quickly reheat in the microwave for a few seconds)